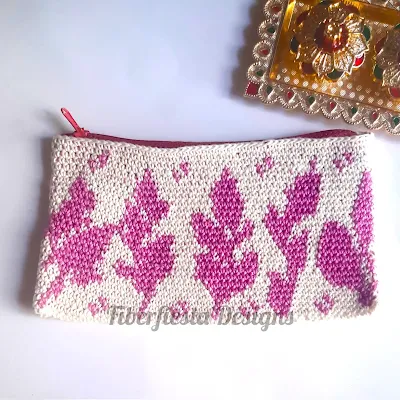
Storage accessories crochet pouch design - leaf zipper pouch
Crochet pouch free pattern - leaf Zipper pouch
My Favorite Little Crochet Pouch
I just had to share this pouch I recently made—it's the first one I’ve ever done using sport weight yarn, and I’m honestly so happy with how it turned out! The colors are really fun and contrast beautifully, which makes it stand out in the best way.
It’s become my go-to crochet kit. I can fit all my essentials in it—hooks, measuring tape, scissors, stitch markers, and even my tapestry needle (which I’ve secured on a small piece of fabric so it doesn’t get lost). Everything fits nicely without it feeling too bulky.
I take this pouch with me pretty much everywhere. Since I love crocheting in my spare time, it’s super handy to always have my tools with me. And funnily enough, wherever I go, someone ends up asking me about it! It’s a bit of a hit in my crochet community, and I hope others will love this design just as much.
If you’re thinking of making your own, I totally recommend trying sport weight yarn—you’ll love the results!
---
Affiliate disclosure:
This blog may contain affiliate links, meaning I may earn a small commission if you purchase through these links at no extra cost to you.
---
I Designed a Crochet Pouch I Absolutely Love!
I have to say—I designed a crochet pouch that I absolutely love, and I’m so excited to share it with you all! 🧶✨
Creating this pouch was such a fun and satisfying experience. The colors, the texture, the way everything came together—it's one of those projects that just made me smile the whole way through. I genuinely hope you find it as lovely and useful as I do.
This little pouch has already become a favorite in my collection, and I can't wait to show you how I made it and what I keep inside. It’s the perfect mix of cute and practical!
Stay tuned—there are more creative designs on the way. Let’s get started!
---
Materials
Yarn & Materials I Used
For this pattern, I used Gulera Yarn —a mercerised 100% cotton yarn that works beautifully for crochet projects like this. It has a nice sheen, great stitch definition, and a smooth texture that makes it a joy to work with.
If you can’t find Gulera Yarn, don’t worry! A great alternative is Patons 100% Cotton 4 Ply, which you can easily find on LoveCrafts. It’s a similar weight and feel, and works just as well for this pouch design.
Here are two color options I recommend:
* Candy (1734) – a soft, playful shade
* Cream (1692) – a warm, classic neutral
The rest of the materials you’ll need are listed in the image above—just scroll up to check them out!
---
Notes Before You Start
Here are a few things to keep in mind before diving into this pattern:
🧶 Tapestry Crochet:
This pattern uses tapestry crochet, so it’s helpful to be familiar with the technique. You’ll be working with two colors and carrying the unused yarn along as you go.
🔁 Continuous Rounds:
You'll be working in continuous rounds —that means no joining at the end of each round with a slip stitch. Just keep crocheting in single crochet stitches (sc) around and around.
📍 Stitch Markers Help:
Use a stitch marker to mark the beginning of each round. This will help you keep track of where your rounds start and end, since you’re not joining.
🎨 Color Changes:
Follow the color chart provided in the pattern to know when to switch colors. The colors are labeled as:
* L for Lilac colour
* F for Fresh egg shell colour(cream)
Take your time with the color changes—once you get the rhythm, it becomes really fun!
---
Pattern -
Let’s Get Started – Creating the Base
We’ll begin by making the base of the pouch. Don’t worry—it’s simple once you break it down step by step!
🧶 Start with Fresh Egg Shell yarn (F):
1. Chain 52.
This will form the foundation of your pouch.
2. Working Around the Chain:
You’ll be crocheting on both sides of the chain to create an oval base.
* Skip the very first chain (the one on your hook), then make 50 single crochets (sc) —one in each chain.
* In the next stitch (the 51st chain), make 2 sc.
* Now, without skipping any stitches,start crocheting on the opposite side of the chain—the other side of the same foundation stitches.
* In that same stitch where you made the 2 sc, make 1 more sc. (So this stitch has 3 sc total .)
* Continue along the other side with 49 sc.
* In the very last stitch, make 2 sc again.
📏 You should now have a total of 104 single crochet stitches around the entire chain.
🔄 Finish this round with 1 slip stitch (sl st) to join.
👉 This is the only time you’ll join with a slip stitch—after this, you’ll continue working in continuous rounds.
🌈 Just a reminder:
* L stands for Lilac (your second color)
* F stands for Fresh Egg Shell (your main color)
And that’s it—your pouch base is ready!🎉
Now you're all set to begin the main body of the pouch in tapestry crochet.
---
Round 1 – Let’s Add Some Color! 🌸
Now that the base is done, we’re ready to start building the sides of the pouch—and this is where the fun begins because we’re introducing our second color: Lilac (L)!
We’ll be working in tapestry crochet, which means you'll be switching colors in the middle of the row, but don’t worry—it’s easier than it sounds once you get the hang of it.
✨ Starting with Lilac:
* Your hook should currently have 1 loop of Fresh Egg Shell (F) on it.
* Now, take the Lilac (L) yarn, yarn over, and pull it through that loop.
* You’ve now brought Lilac into the work!
* Start a single crochet (sc) using Lilac, but before you finish the stitch, switch back to Fresh Egg Shell (F) to complete it.
This is how you’ll do all your color changes —always switch to the new color before completing the previous stitch so the next one starts with the right color.
---
🎨 Here's the Color Pattern for Round 1:
(Use Fresh Egg Shell = F, and Lilac = L)
* Start with 1 sc in Lilac (L)
* Then 6 sc in Fresh Egg Shell (F) (but switch to Lilac on the last stitch)
* 1 sc in Lilac (L), finish with F
* 5 sc in F
* 2 sc in Lilac (L)
* 4 sc in F
* 1 sc in Lilac (L)
* 4 sc in F
* 1 sc in Lilac (L)
* 5 sc in F
* 1 sc in Lilac (L)
* 6 sc in F
* 1 sc in Lilac (L)
* 7 sc in F
* 1 sc in Lilac (L)
* Then, for the back side of the pouch, just make 52 sc in Fresh Egg Shell (F)
Keep carrying the unused yarn neatly inside the stitches (like in tapestry crochet), and make sure your tension stays even.
---
🧵 What’s Next?
* You’ll keep following this color chart to build up the design.
* Repeat the process for a total of 27 rounds.
* Once that’s done, you’re ready to sew in the zipper and finish your beautiful pouch!
---
---
A Few Helpful Notes Before You Continue
* As you move into the next round, you'll start with Lilac (L) again.
Be sure to place a stitch marker in that first stitch to mark the beginning of your round—this really helps when working in continuous rounds.
* Since we're using tapestry crochet, remember this important tip:
Always carry the unused yarn (the color you're not using at the moment) inside your stitches. This keeps the inside of the pouch neat and helps maintain even tension across your work.
That’s it—just a couple of small things to keep in mind that make a big difference as you go!
---
💡 Need a Little Extra Help?
If you're having any trouble following the instructions, don’t worry—I’ve got you covered!
You can check out the printable version of this pattern, which includes both written instructions and a step-by-step photo tutorial. It’s available on LoveCrafts and Ravelry—super easy to access and great for visual learners.
🎁 Want More Value?
The patterns are already priced affordably, but if you’re looking for an even better deal, I invite you to join my FiberFiesta Perks Club!
✨ It’s completely free to join, and members receive:
* Exclusive monthly discounts
* Special offers to help keep your craft costs low
* Extra support if you're running a small crochet or handmade business
This club is my way of supporting fellow makers who love creating beautiful things without breaking the bank.
👉 If that sounds like you, definitely come join the FiberFiesta Perks Club —I’d love to have you in the community!
---
🧵 Final Thoughts
Once you’ve made your pouch, don’t forget to share your creations with me —I’d absolutely love to see them! 💕
You can:
* Tag me on Instagram
* Post in my Facebook group
* Or simply leave a comment right here
I’ll be waiting to see your beautiful work—sharing is the best part of our creative community! 😊
📣 Stay Connected
If you haven’t already, come join my Facebook group, where I share all my latest designs, exclusive discounts, and special offers. It’s a fun and supportive space for crochet lovers!
🔗 Looking for Links?
You’ll find all the useful links at the bottom of this page.
Everything—from the printable pattern to my social media handles and Facebook group—is listed there for easy access. 😊
And don't forget—you can save this post to Pinterest so you’ll always have it handy for later!
---


Comments
Post a Comment
Comments pls