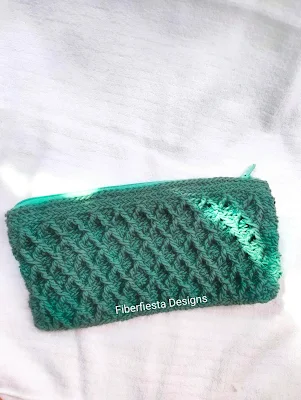
Tapestry accessory crochet pouch pattern- snowblue pouch
Tapestry Crochet pouch free pattern - snowblue pouch
Winter season is a perfect season to crochet bags and what to say if we have patterns to crochet bags. This free pattern is for those who like to crochet in winter. This pouch is perfect for storing your small essentials. We can also gift this to someone.

Disclosure
This blog may contain affiliate links, meaning I may earn a small commission if you purchase through these links at no extra cost to you. As an affiliate, I only recommend products or services I personally use and believe will add value to my readers.
When I saw my messy wardrobe, I realized it needed organizing. While doing so, I got the idea to make this pouch. It was interesting to think about what design to include. After considering many designs, I came up with one that I really liked. Designing it and then bringing it to life was a lot of fun. This proved to be very helpful in organizing my messy wardrobe. Then I thought, why keep it to myself?
You can also join my Facebook group, where I share all my designs and any discounts or offers I come up with.
"If you'd like a printable PDF pattern, you can grab it from my Ravelry store and Lovecrafts And don't forget, you can also save this post to Pinterest for easy access later!"
Notes-
Now, let's see how to make it. It’s very simple. We just need to learn how to create the base for the pouch first. Then, we can follow the color chart step by step to make it.

Once the base is made, start with the first row of the color chart, moving from right to left. Then, create the back portion to complete the row. After finishing one row, start the next one. This means you don’t need to join anything in between. Finally, end it with a chain stitch.
Details-
skill level-
Intermediate
Yarn-
Ganga acrowools cotton delight yarn-
White COD002 ( off white)
Blue COD010 (midnight Blue)
"If this is not available, you can select one from Lovecrafts"
Hook size -
3.5 mm
measurement-
Yarn used -
White - 18 mtrs
Blue - 70 mtrs
Yarn gauge -
22 st , 13 ROWS
Other material -
Scissor
Stitch marker
Needle for weaving end
Zipper
Abbreviation-
ch-chain
st- stitch
sc-Single crochet
LCS- Low cross stitch
BLOB =Back Loop only
BASE -
Chain 48 +1
"Start by making 46 single crochets (sc) from the second chain after the hook. Then, make 2 single crochets in the last stitch. After that, work single crochets on the underside of the chain. Starting from the very first chain, make 46 single crochets, and in the last chain, make 2 single crochets. Your base is ready."
"You need to keep in mind that while making the base, after completing 48 single crochets (sc) for the front row, you should place a stitch marker on the 49th stitch. After making another 48 sc, place a stitch marker on the very first stitch where you started. Doing this will help you identify where the front and back rows are starting."
Low cross stitch -
"This pouch is made using the back loop only low cross stitch. To make it, you need to insert the hook into the back loop of the single crochet (sc) in the row below. Then, pull the yarn under and bring it through the loop. Now you have 2 loops on your hook. Next, yarn over and pull through both loops on the hook."
"This is just like a normal single crochet (sc). The only difference is that we work it through the back loop, and when pulling the yarn through the back loop, we pull it under the hook instead of over."
Now , start making rows-
Row 1 ) - "The first row is entirely in blue, as shown in the color chart. You need to complete the first row by working low cross stitches in the back loops."
Row 2 ) - "In the second row, start with 1 blue stitch, then 4 white stitches, followed by 2 blue stitches, and then 4 blue stitches again. In this way, you need to complete the second row for the front section. After completing the front second row, make the entire back side of the pouch in blue."
"Now, you need to complete the entire pouch by following the color chart in the same way."
Color chart-

How to read color chart -
Following the color chart is easy. You always need to move from right to left because we start the pouch from the bottom and build it up to the top, round by round. The color chart is only for the front side, while the back is entirely blue.
Step by step photo tutorial -
Base


Color chart


Comments
Post a Comment
Comments pls